

How To Repair Water Damage On Wood Desk
Today I'm going to bear witness you how to rapidly and hands repair chipped or groovy wood veneer on a article of furniture.

Have you ever bought something at the thrift shop or on Facebook Marketplace, simply to get information technology home and realize that the wood veneer on information technology is chipped, cracked, or otherwise but in bad shape?
Because, my goodness, this has happened to me more than oftentimes than I'd like to admit.
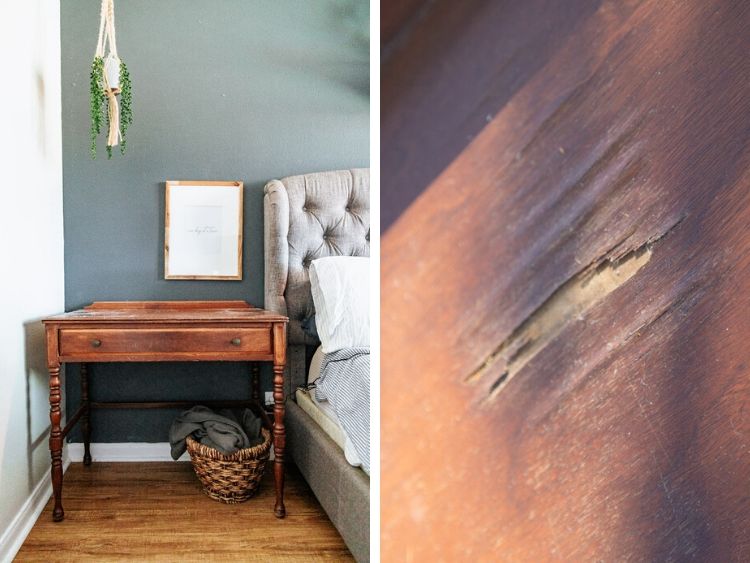
I recently institute the cutest little desk on Facebook that I but had to accept for my sleeping room, but it wasn't until nosotros had paid for information technology and were putting information technology into the truck that nosotros realized there was a large spot on the top of the desk where the veneer had bubbled upwards and was peeling away. Information technology was not a cute look, but at this indicate I was fully in love with the desk and in that location was really no turning back.
The desk sabbatum in my sleeping accommodation, terrible veneer and all, for months while I tried to figure out what to do with it. I wanted to exit information technology wood-toned, but repairing wood veneer to the point of beingness able to stain it requires a high level of skill (and patience) that, quite bluntly, I just don't have. Repairing it to exist painted, even so, is a much simpler story. So, afterward doing aaaaaaaall the research, I finally decided that I was going to give it a new look with some paint and a quick veneer patching job.
This post is sponsored past Mohawk Consumer Products. Thanks for supporting the brands that support Love & Renovations!
Before nosotros dive into the full tutorial, I did brand a quick video to show y'all how the process works in real time. If you're a visual learner, that may exist more your speed!
You can sentinel the video beneath, or click over to my YouTube channel and find information technology there. Of course, for those of the states who adopt to acquire our data in written class (raising my hand here) or even a combo, I've got all the details for y'all after the video!
But, don't skip watching information technology. In that location'due south nothing more satisfying than seeing that veneer pop right off in hyper-speed.
Alright, ready for the nitty gritty? Let'due south do this.
How to repair damaged wood veneer
Materials Needed:
- Mohawk Epoxy Putty Stick
- Utility Knife
- Sandpaper (If yous've got a powered sander, utilise that!)
- Pigment + paintbrush
Remove the damaged veneer

The offset thing you lot'll need to exercise is pull upward the croaky or damaged veneer. The method you use will vary slightly depending on the location of the harm, but for me it was on the top of the desk so it was pretty uncomplicated.
I simply grabbed my utility knife and scored all around the damaged area, so used the bract (or my fingernails) to popular it right upwardly.
Prepare epoxy putty stick
I've used Mohawk's Epoxy Putty Sticks once before on a little dresser that was damaged, and I was and so impressed with how uncomplicated it was to use that I knew information technology would be the perfect tool to ready this desk too.
I know when yous hear "epoxy" you might go a little intimidated, but I promise there'due south no reason to exist nervous. This is one of the simplest things you'll do – if you lot tin can play with Play-Doh, you tin can apply this stuff!

All you need to do is use your utility pocketknife to cut off a pocket-sized piece of the epoxy putty, and then apply your fingers to mix it up until information technology's all one uniform colour. You tin can run across what this looks like close-up in the video above!
Once it'southward all mixed, you have near ii minutes to work with it and get it into identify before it hardens. It should be more than than enough time if you're mixing up small batches (which I recommend!).
But printing the epoxy putty into the damaged area and flatten it out to make it as level as possible with the superlative of the desk. Concluding time I used this I was repairing a corner, so information technology was a slightly different shape, merely the idea is the same. Simply form the putty to match the piece you lot're repairing as closely as possible.
Don't stress too much about perfection here. You lot'll be sanding it downwards once it dries, so you don't need to get information technology perfectly flat or smooth. Merely endeavour non to pile it on as well thick, or else it'll crave more sanding later.

Sand the excess putty off
The epoxy putty only requires near 30 minutes to dry. Once it'due south fully cured, grab your sandpaper and become to work. I highly recommend using a power sander for this step (information technology'll brand your life waaaaay easier), simply if you have plenty elbow grease y'all tin exercise information technology by hand.
I started with 80-grit sandpaper to remove every bit much of the backlog equally possible. Be careful with such a low grit on your actual furniture slice, though, because you don't want to harm it. I focused all of my sanding but on the putty until it was mostly polish.

Later I had removed most of the excess, I switched over to 180-grit sandpaper and sanded it until it was completely smoothen. Run your hands over the patch to test until yous can't tell where the patch ends and the piece of furniture begins.
Retrieve that this is a pretty fool-proof process. If you don't sand enough (I didn't the first fourth dimension), it'll exist obvious once you add your offset coat of pigment. You can only allow the pigment dry and then sand a bit more until information technology's shine. Rinse and echo until yous go a finish you lot're happy with.
Paint the piece in your desired colour
Now yous're ready to give the rest of the piece a quick sanding and paint information technology!
Y'all tin can read all of my tips for painting furniture right here if yous're unfamiliar with it, merely it's a simple procedure. I used this black paint that doesn't crave a ton of prep (music to my ears), so I just quickly sanded the balance of the piece and so brushed on a couple of coats of paint.
Once that dried, I sealed the unabridged piece to help prevent any chipping, and it looked brand new.
I hateful, y'all tin't even tell that this was in such bad shape just a few days ago!


I placed the desk-bound back into my sleeping room for now, but when we move to our new house in a few weeks information technology'll probably end up living in the game room upstairs. I remember it'south the perfect spot for Jackson to do some LEGO edifice or cartoon, and I don't accept to worry about the veneer peeling up while he's working at it anymore.
When all was said and done, this projection took me about ii hours or and so and I got it washed from start to terminate in just one afternoon.
It makes me feel a little silly to realize that it's been sitting in my room actively abrasive me for months when I could take just knocked it out in a day.
Hopefully this inspires you to ready upwards that slice that's sitting in your house actively annoying you. Or, even better, to not be afraid to pick upward that gorgeous dresser at the thrift shop with a picayune flake of damage. At present, you know how to fix it.
You tin find more data on Mohawk's Epoxy Putty Sticks on their website (including another video tutorial if one wasn't enough for you!), and yous can buy them right here on Amazon. They come in tons of colors and are incredibly affordable, then become forth and offset fixing that wood veneer!

How To Repair Water Damage On Wood Desk,
Source: https://www.loveandrenovations.com/how-to-repair-wood-veneer/
Posted by: jenkinsmorthe.blogspot.com
0 Response to "How To Repair Water Damage On Wood Desk"
Post a Comment